Showing posts with label Recipe. Show all posts

Friday, June 7, 2024

Ginger-Glazed Grilled Honeydew Recipe Gluten Free


Ginger-Glazed Grilled Honeydew


1/4 cup peach preserves
1 tablespoon Lime Juice
1 tablespoon finely chopped crystallized ginger
2 teaspoons grated lemon zest
1/8 teaspoon ground cloves
1 med. Honeydew Melon cut into 2" cubes

Directions
  1. In a small bowl, combine the first 5 ingredients. Thread honeydew onto 6 metal or soaked wooden skewers; brush with half the glaze.
  2. On a lightly oiled rack, grill honeydew, covered, over medium-high heat or broil 4 in. from the heat just until melon begins to soften and brown, 4-6 minutes, turning and basting frequently with remaining glaze.

Monday, December 4, 2023

Cute Christmas Cupcake Idea!


These look so cute and fun! Great for kid's class...

Church Get togethers...any get together for that 

matter! 

Also easy to make gluten free!


Wednesday, June 28, 2023

Peach Caprese Salad


Peach Caprese Salad


CREDIT

Peach Caprese Salad

Ingredients 

For Vinaigrette:

For Salad:

  • 2 large ripebut not overly ripe peaches, sliced with skin on, almost 1/2 in. thick
  • 1 ball fresh mozzarellasliced
  • 1 bunch fresh basil


Instructions

  • Mix: Combine all the ingredients for the vinaigrette, and set aside in refrigerator.
  • Layer: Arrange slices of peaches, mozzarella, and fresh basil leaves on top of each other.
  • Drizzle and Serve: Drizzle the vinaigrette on top, and enjoy!

Notes

Grilled Peach Option: Heat grill to high. Once hot, set peach slices on top, and cook just until grill marks appear. Don't overcook.
I came across this delicious recipe on Chewoutloud.com and I can't wait to try it! Yummy!
And no cooking required! 

Wednesday, June 7, 2023

Simple Strawberry Tea Sandwiches


INGREDIENTS
  

  • 6 slices fresh white bread (or bread of choice)
  • 12-14 ounces strawberry cream cheese (softened to room temperature)
  • 6-8 fresh strawberries


  • INSTRUCTIONS


  • Spread one side of each slice of bread with cream cheese. you can easily use gluten free bread to make this cream cheese. Also see below for other ideas**
  • Slice the strawberries in thin slices and arrange on the cream cheese. For open-faced sandwiches, top all 12 hearts with strawberries. For closed-faced sandwiches, top 6 hearts with strawberries and top with the remaining 6 hearts.
  • Serve immediately. 


NOTES

  1. You can use a cookie cutter, or use a knife to trim the crusts off of the bread.  Slice in half diagonally and in half again to form small triangles.
  2. For the best results, assemble the sandwiches right before serving.  If necessary, the sandwiches can be assembled no more than 1 day ahead of time.  Wrap in parchment and refrigerate in an airtight container.  If the strawberries are juicy, wait to add them until right before serving so the sandwiches don't turn soggy.


**You can variate this recipe by swapping out the strawberry cream cheese for regular cream chees, or add mayo/basil combo...even put cucumber on. That will help you control the sweetness. Have fun with putting your twist on it!


Thursday, June 1, 2023

Gluten Free Crack Corn Dip (Mexican Dip, Cowboy Dip)


Ingredients In Crack Corn Dip

  • Corn: Whole kernel canned corn is the star of this recipe. It gives flavor, texture, and a slight sweetness. You can also use thawed frozen corn.
  • Jalapeños: This recipe calls for both canned and fresh jalapeños. If you want to lessen the heat make sure to remove both the seeds AND the veins (the inner white part) from the jalapeños, as that’s where most of the heat comes from.
  • Red Pepper: This will add a nice crunch to the dip.
  • Mayonnaise and Sour Cream: For the best flavor you’ll want to use the full fat versions of these ingredients.
  • Cheddar Cheese: I usually use sharp cheddar in this dip because it has a stronger flavor and a nice tang, but you can also use mild or medium cheddar. For a spicier and even bolder taste, you can try using Pepper Jack cheese!
  • Green Onions: Also known as scallions, these give the dip a mild onion taste. This recipe calls for using the whole onion, not just the white part. It’s easy to mix up green onions and spring onions when in a rush, so make sure to check the labels when buying them.
  • Garlic Powder: This gives the dip just the right amount of garlic flavor without being overpowering.
  • Corn Chips: A great dip is not complete without corn chips!

How To Make Crack Corn Dip

  • In a large mixing bowl, combine all the ingredients together. 
  • Mix well until all the ingredients are fully combined. 
  • Cover with plastic wrap and chill for at least two hours.
  • Transfer to a serving dish and top with fresh jalapeño slices and serve with corn chips.

Tips For Making The Best Crack Corn Dip

  • To ensure your dip is nice and thick, make sure to drain all of the liquids from the canned ingredients.
  • This dip will taste even better the next day, so it’s a great option to make ahead. The extra time in the fridge will help the ingredients blend together, making the dip more flavorful. It will last in the fridge for about 4 days.
  • Crack Corn Dip can be eaten with more than just chips! You can use it as a dip for fresh veggies, crackers, or bread. It can even be used as a filling for tacos or wraps!

What Is Crack Dip Made Of?

Most crack dips are made with a base of sour cream, cream cheese, and shredded cheese. Crack corn dip is a little different as it has a cold and creamy dip base made with mayonnaise, sour cream, and shredded cheddar cheese. 

How To Store Crack Corn Dip

Store leftovers in an air-tight container in the refrigerator.


Please check out her blog! She has tons of seasonal recipes, desserts, and pizza! All gluten free!

https://www.mamaknowsglutenfree.com/


Tuesday, December 13, 2022

Super Easy Brownie Christmas Trees!


Super Easy Brownie Christmas Trees! 


Just made your favorite box of brownies-even gluten free!
Cut into triangles and decorate with a little icing and coated
candies! Peppermint stick can serve as the trunk!

Super cute! 
Recipe from Betty Crocker

Monday, November 7, 2022

Apple Cider Donut Muffins


I first made these in 2013,  but they continue to be a hit!


mix together the wet ingredients:

1 cup apple cider
1 large egg
3 tablespoons melted butter
1 teaspoon vanilla


In another bowl, whisk together:
2 cups King Arthur gluten free 1:1 flour
1/2 cup brown sugar
1 teaspoon baking powder
1/2 teaspoon baking soda
1/2 teaspoon salt 

1/2 tsp cinnamon

4tsp. apple pie spice

1/4 c. crushed hazel nuts (or other nuts)


Gently mix both ingredient bowls together-by hand

and very lightly-just until combined.


Place in muffin pan with liners. Makes 12


bake at 350 degrees for about 15 min.


Melt about 1.2 c. butter in a bowl 

& about 1/2 c. of sugar-adjust to your own taste

(you can also add cinnamon or other spices to sugar)

When muffins are out of the oven and still hot, dip

tops in melted butter and then in the sugar.


So yummy!


Friday, October 28, 2022

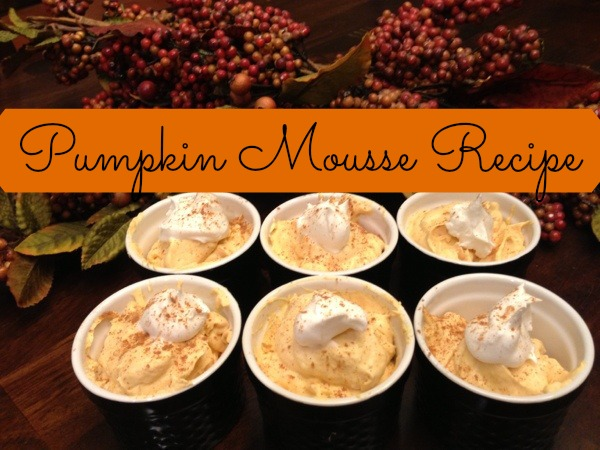
Easy Gluten Free Thanksgiving Dessert: Pumpkin Mousse Recipe


Check out ClassyMommy.com for more gluten free recipes!

Pumpkin Mousse Recipe Ingredients

  • 1 box of vanilla instant pudding and pie filling mix
  • 1/4 teaspoon pumpkin pie spice (Alternatively you can use Cinnamon – but any version of Pumpkin Pie Style spices taste best!)
  • 2/3 cup Evaporated Fat Free Milk (Small 5 fl. oz can)
  • 1 cup LIBBY’S 100% Pure Pumpkin – (This is about 2/3 of a can)
  • 2 1/2 cups thawed fat-free frozen whipped topping

Pumpkin Mousse Preparation Directions

  1. Mix together your dry ingredients first – the pudding mix and pumpkin spice.
  2.  Next, using a whisk, add in your evaporated milk. Mix well.
  3.  Add in your Libby’s pure pumpkin and stir everything well.
  4.  Finally add your thawed out whipped topping.
  5.  I recommend 2 1/2 cups of whipped topping as I find the pure pumpkin very rich.You can add more or less to taste if you’d prefer but my family likes this ratio best.
  6. After you scoop the pumpkin mousse into serving cups, top with a dollop of whipped cream and sprinkle more cinnamon or pumpkin spice on top.

Wednesday, March 24, 2021

Gluten Free Lemon Cake

 3x

Gluten Free Lemon Cake


For the Lemon Cake:

  • 1/2 cup milk (I use unsweetened almond milk)
  • 3 Tbsp lemon juice
  • 3/4 cup sugar (I used organic cane sugar)
  • 2 Tbsp lemon zest (about 2 lemons’ worth)
  • 1/2 cup avocado oil (can sub melted coconut oil, butter or vegan butter)
  • 3 eggs
  • 1/2 tsp vanilla extract
  • 1 3/4 cup gluten free all purpose flour baking blend (like Bob’s Red Mill 1-to-1 Baking Flour)
  • 1 1/2 tsp baking powder
  • 1/4 tsp baking soda
  • 1/2 tsp salt

For the Lemon-Honey syrup:

  • 1 Tbsp honey
  • 2 Tbsp lemon juice

For the Lemon Glaze:

  • 1 Tbsp lemon juice
  • 2 Tbsp milk (I use almond milk)
  • 1/2 tsp vanilla
  • 2 cups powdered sugar, sifted (I measure, then sift)

INSTRUCTIONS

For the cake:

  1. Preheat oven to 350 degrees. Grease a 9″ cake pan with spray oil and line the bottom with a parchment paper circle*
  2. In a liquid measuring cup (or a small bowl), combine lemon juice and milk. Let sit for about 5 minutes.
  3. While the lemon juice and milk is sitting, rub lemon zest into the sugar in a large bowl. This gets the lemon oil into the sugar and distributes the flavor really well.
  4. Add milk mixture, avocado oil, eggs, and vanilla. Whisk until well combined.
  5. In a medium bowl, stir together flour blend, baking powder, baking soda, and salt. Stir the dry ingredients into the wet ingredients and mix until just combined. (Or you can simply sprinkle the dry ingredients over the wet before stirring)
  6. Pour into your prepared 9″ cake pan.
  7. Bake at 350 degrees F for 25-30 minutes, or until a toothpick inserted in the center comes out clean.
  8. Place on a cooling rack in the pan for 10 minutes to cool slightly before turning out onto a plate.
  9. While the cake cools slightly, mix up your lemon honey syrup (see below)
  10. After 10 minutes cooling in the pan, turn the cake out onto a plate or cake stand and brush with the still-warm cake with lemon honey syrup.
  11. When the cake has cooled completely, top with glaze.

For the Lemon-Honey Syrup:

  1. Stir together lemon juice and honey. Brush over the cake when it’s still quite warm (as soon after removing the cake from the cake pan as you can). Let cake brushed with syrup cool completely before adding the glaze.

For the Lemon Glaze:

  1. Sift powdered sugar into a large bowl. Add lemon juice, milk, and vanilla. Whisk or beat until smooth. (Ideally, you want the glaze to be opaque and to hold its shape when it drips down the sides of the cake. If yours is too thin, add more powdered sugar 1 Tbsp at a time. If it’s too thick, add more milk 1 teaspoon at a time until you reach the right consistency.)
  2. Pour glaze over your cooled cake and gently spread it toward the edges. Let some of the glaze run down the sides. Let set completely before cutting and serving.

NOTES

You can absolutely make this in a stand mixer or food processor instead of in a mixing bowl. Your preference!

*To cut a parchment circle, I trace the bottom of my cake pan on parchment paper, then cut it out. It’ll be the perfect size!


Tuesday, November 24, 2020

No Bake Pumpkin Cheesecake


6.5 hours · Vegetarian · Serves 12 · Easy, creamy no-bake pumpkin cheesecake is perfect for fall! Crunchy graham cracker crust and delicious pumpkin spice flavor


11 ingredients


Produce
  • 2 cups Pumpkin puree

Baking & Spices
  • 1/2 cup Brown sugar
  • 1/2 tsp Cinnamon
  • 1 1/2 cups Graham crumbs
  • 1 cup Powdered sugar
  • 1 tbsp Pumpkin pie spice
  • 2 Tabelspoons brown sugar
  • 2 tsp Vanilla extract
Dairy
  • 6 tbsp Butter, unsalted
  • 24 oz Cream cheese
  • 2/3 cup Heavy cream


Cinnamon Graham Cracker Crust

The graham cracker crust is made with graham crumbs, a little brown sugar, just a hint of cinnamon & melted butter. You can either buy graham crumbs in the baking aisle of the grocery store or buy graham crackers and blitz them in your food processor (or by hand).


Pumpkin Cheesecake Filling

Then it’s time to get on with the creamy pumpkin cheesecake. It’s made without gelatin – which I totally love – and is oh so smooth.

Before getting started, blot the pumpkin puree with a paper towel and squeeze out the excess liquid. This step is super important because if too much liquid gets into the cheesecake, it can have a hard time setting. 


Then to make the filling:

  1. Beat the whipped cream until stiff peaks form.
  2. Then in a separate bowl beat the cream cheese until soft. Then mix in the sugars and pumpkin spices.
  3. Mix in the pumpkin puree and vanilla extract.
  4. Then gently fold in the whipped cream. The key here is gentle. You want to keep the volume of the whipped cream so that the cheesecake stays light and fluffy.
The creamy pumpkin cheesecake goodness then gets spread over top of the crust and then it goes into the fridge to chill for at least 6 hours (or preferably overnight). 

Tips for Making this Pumpkin Cheesecake

  • I recommend using a 9-inch springform pan. A 10-inch springform pan will also work too.
  • Make sure to use full fat, brick-style cream cheese. If you use other cream cheese types – it may not set properly.
  • If you prefer cool whip instead of whipped cream, feel free to use it instead. Measure out 1 cup, and fold it into the pumpkin mixture at the end.
  • Make sure to use 100% pure pumpkin and not premade pumpkin pie filling. Pumpkin pie filling has a bunch of other ingredients that we don’t need in it.
  • If your cheesecake doesn’t seem to be firming up enough, place it in the freezer.
  • On that same note – this cheesecake freezes well. Then thaw it in the fridge.

This pumpkin no-bake cheesecake is the perfect combo of creamy cheesecake goodness and pumpkin pie. Plus – it’s perfect for Thanksgiving because it doesn’t even take up any oven space.


Monday, February 10, 2020

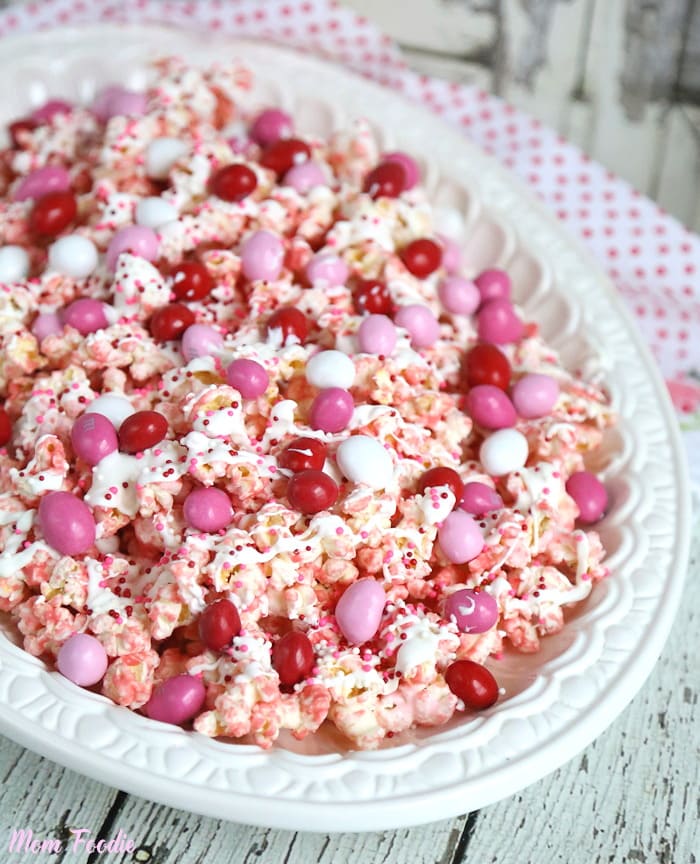
Valentines Day Popcorn Recipe

Valentines Day Popcorn
credit
Valentines Day Popcorn Recipe
Prep Time
5 mins
Cook Time
5 mins
Easy Valentines Day Popcorn recipe that features Pink Chocolate Covered Popcorn with white chocolate drizzle, sprinkles and M&Ms.
Course: Snack
Cuisine: American
Servings8
AuthorRobin Gagnon
Ingredients
  • 1 bag of microwave popcorn light or regular butter (full sized, not snack)
  • 3/4 cup pink chocolate candy melts
  • 1/2 cup white chocolate candy melts
  • Valentines sprinkles
  • Valentines Peanut M&Ms
Instructions
  1. Pop the popcorn and remove the unpopped kernels.
  2. Place the candy melts in small bowls or glass measuring cups, one for each color.
  3. Microwave the pink candy for 40 seconds then stir, repeat in 20 second intervals until melted and smooth. (takes 1-1 1/2 minutes dependent on melt brand and your microwave).
  4. Drizzle half over of the bowl of popcorn and toss to coat, Add the remaining pink chocolate candy melt (use a silicone spatula to ensure you get it all out.) Toss the popcorn with your hands until nicely coated. Then spread out onto a large serving platter (or baking sheet, if you are going to bag the popcorn up after).
  5. Melt the white candy melts and drizzle over the platter of popcorn, immediately top generously with candy sprinkles. They will adhere to the melted white chocolate candy.
  6. Finally, toss on the M&Ms. Allow the Valentines Popcorn to cool a few minutes before serving.