Showing posts with label Gluten Free. Show all posts

Friday, June 7, 2024

Ginger-Glazed Grilled Honeydew Recipe Gluten Free


Ginger-Glazed Grilled Honeydew


1/4 cup peach preserves
1 tablespoon Lime Juice
1 tablespoon finely chopped crystallized ginger
2 teaspoons grated lemon zest
1/8 teaspoon ground cloves
1 med. Honeydew Melon cut into 2" cubes

Directions
  1. In a small bowl, combine the first 5 ingredients. Thread honeydew onto 6 metal or soaked wooden skewers; brush with half the glaze.
  2. On a lightly oiled rack, grill honeydew, covered, over medium-high heat or broil 4 in. from the heat just until melon begins to soften and brown, 4-6 minutes, turning and basting frequently with remaining glaze.

Friday, June 23, 2023

Watermelon Cake made with fresh fruit, and gluten free!


Watermelon Cake

I saw this recipe at Allergic Living and love the way this looks! I am going to try this!
Gluten free, healthy and Yummy!


From Allergic Living

Ingredients for Watermelon Cake

  • 1 large seedless watermelon, washed and dried
  • 1 1/2 cups blueberries, washed and dried
  • 1 cup blackberries, washed and dried
  • 1 cup raspberries, washed and dried
  • 2 cups strawberries, washed and dried
  • 1 cup seedless yellow watermelon, washed and dried, then cut into shapes
  • 1 cup grapes, washed and dried 

Instructions for Watermelon Cake

  1. Thoroughly wash the outer surface of the watermelon. This will prevent any exterior surface dirt or bacteria from being transferred into the inside of the watermelon when you cut into it. 
  2. Using a sharp chef’s knife, carefully cut off the top stem portion and bottom portion of the watermelon. Set aside for later use or discard. Place the remaining center portion of the watermelon upright, so it stands flat on your cutting surface. The watermelon cake shown was approximately 7 inches tall when standing upright. But your watermelon may be shorter or taller, depending on the size of your party. Level out any uneven areas, until you are left with a flat base and top.  
  3. It’s time to remove the rind. With the watermelon still standing upright on your cutting board, begin cutting the outer rind from top to bottom. Follow the natural shape of the watermelon, until all the rind has been removed. Note: You may have to flip the watermelon upside down to trim any visible rind off the bottom section.
  4. Trimming: With its signature pinkish/reddish hue now showing, carefully trim any uneven areas of the outer surface. You’re looking to have a smooth, round and cake-shaped watermelon.
  5. Next, cut a circular well into the top of the watermelon by cutting 1 inch from the edge, and approximately 1-2 inches deep. Use a teaspoon or dinner spoon to scoop out the watermelon, absorbing the excess juice with paper towel. This round opening is where your decorative fruit will go. 
  6. Place the watermelon on the center of your serving platter or dish. Choose a sturdy dish, since a full-size watermelon cake is going to be heavy.
  7. Decorate the cake with clean fresh fruits (or your own favorite choices). Place a variety of fruits around the base of the cake and inside the top circle. Use contrasting fruit colors to enhance visual appeal. For a more creative flair, use a melon baller or fruit shape cutters. 
  8. Refrigerate until chilled or serve immediately. Enjoy! 

Tuesday, June 13, 2023

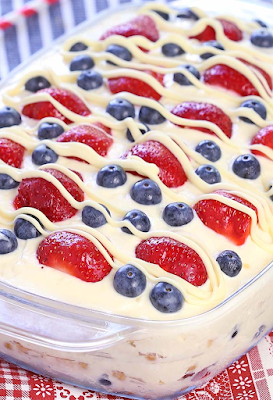
No Bake Summer Berry Icebox Cake

I ran across this brilliant idea while visiting cakescottage.com and thought it was a lovely idea with July 4th coming up soon!

No Bake Summer Berry Icebox Cake


CREDIT

This is a beautiful cake that would grace any table for a Patriotic holiday!
Author: 
Recipe type: Dessert
Serves: 12-16
Ingredients
  • 19 oz graham crackers
  • 8 oz cream cheese, softened
  • 2 (3.4 oz) packages Vanilla Instant Pudding
  • 2-1/2 cups cold milk
  • 12 oz Cool whip (or homemade whipped cream)
  • 3 cups fresh strawberries, sliced
  • 1-1/2 cups fresh blueberries
  • 2 oz white chocolate chips
Instructions
  1. Beat cream cheese and dry pudding mixes in large bowl with mixer until blended.
  2. Gradually beat in milk.
  3. Gently stir in Cool Whip or homemade whipped cream, reserving ½ cup.
  4. Spread a thin layer of cool whip in a 9x13 pan just to coat the bottom.
  5. Layer 5 graham crackers across the center of the pan, then 2 more, breaking them as needed to fit around the top and bottom edges.
  6. Spread a layer of pudding mixture over grahams and top with a layer of blueberries and sliced strawberries.
  7. Place graham crackers on top of berries, then pudding mixture, then layer of berries again.
  8. Repeat the graham-pudding-berries layers 1 more time (3 times total) and you should reach the top of the pan.
  9. Refrigerate for at least 4 hours or overnight until the graham crackers have softened completely.
  10. When ready to serve, melt white chocolate chips in a bowl as directed on package and drizzle over dessert.
  11. You can use a spoon to drizzle it over the tops of the berries or you can put it into a small zip-top bag and snip of the corner for an easy "piping bag."

You could easily make this gluten free by using gluten free graham crackers, and making sure your white chocolate chips are gluten free!

Thursday, June 1, 2023

Gluten Free Crack Corn Dip (Mexican Dip, Cowboy Dip)


Ingredients In Crack Corn Dip

  • Corn: Whole kernel canned corn is the star of this recipe. It gives flavor, texture, and a slight sweetness. You can also use thawed frozen corn.
  • Jalapeños: This recipe calls for both canned and fresh jalapeños. If you want to lessen the heat make sure to remove both the seeds AND the veins (the inner white part) from the jalapeños, as that’s where most of the heat comes from.
  • Red Pepper: This will add a nice crunch to the dip.
  • Mayonnaise and Sour Cream: For the best flavor you’ll want to use the full fat versions of these ingredients.
  • Cheddar Cheese: I usually use sharp cheddar in this dip because it has a stronger flavor and a nice tang, but you can also use mild or medium cheddar. For a spicier and even bolder taste, you can try using Pepper Jack cheese!
  • Green Onions: Also known as scallions, these give the dip a mild onion taste. This recipe calls for using the whole onion, not just the white part. It’s easy to mix up green onions and spring onions when in a rush, so make sure to check the labels when buying them.
  • Garlic Powder: This gives the dip just the right amount of garlic flavor without being overpowering.
  • Corn Chips: A great dip is not complete without corn chips!

How To Make Crack Corn Dip

  • In a large mixing bowl, combine all the ingredients together. 
  • Mix well until all the ingredients are fully combined. 
  • Cover with plastic wrap and chill for at least two hours.
  • Transfer to a serving dish and top with fresh jalapeño slices and serve with corn chips.

Tips For Making The Best Crack Corn Dip

  • To ensure your dip is nice and thick, make sure to drain all of the liquids from the canned ingredients.
  • This dip will taste even better the next day, so it’s a great option to make ahead. The extra time in the fridge will help the ingredients blend together, making the dip more flavorful. It will last in the fridge for about 4 days.
  • Crack Corn Dip can be eaten with more than just chips! You can use it as a dip for fresh veggies, crackers, or bread. It can even be used as a filling for tacos or wraps!

What Is Crack Dip Made Of?

Most crack dips are made with a base of sour cream, cream cheese, and shredded cheese. Crack corn dip is a little different as it has a cold and creamy dip base made with mayonnaise, sour cream, and shredded cheddar cheese. 

How To Store Crack Corn Dip

Store leftovers in an air-tight container in the refrigerator.


Please check out her blog! She has tons of seasonal recipes, desserts, and pizza! All gluten free!

https://www.mamaknowsglutenfree.com/


Monday, November 7, 2022

Apple Cider Donut Muffins


I first made these in 2013,  but they continue to be a hit!


mix together the wet ingredients:

1 cup apple cider
1 large egg
3 tablespoons melted butter
1 teaspoon vanilla


In another bowl, whisk together:
2 cups King Arthur gluten free 1:1 flour
1/2 cup brown sugar
1 teaspoon baking powder
1/2 teaspoon baking soda
1/2 teaspoon salt 

1/2 tsp cinnamon

4tsp. apple pie spice

1/4 c. crushed hazel nuts (or other nuts)


Gently mix both ingredient bowls together-by hand

and very lightly-just until combined.


Place in muffin pan with liners. Makes 12


bake at 350 degrees for about 15 min.


Melt about 1.2 c. butter in a bowl 

& about 1/2 c. of sugar-adjust to your own taste

(you can also add cinnamon or other spices to sugar)

When muffins are out of the oven and still hot, dip

tops in melted butter and then in the sugar.


So yummy!


Friday, October 28, 2022

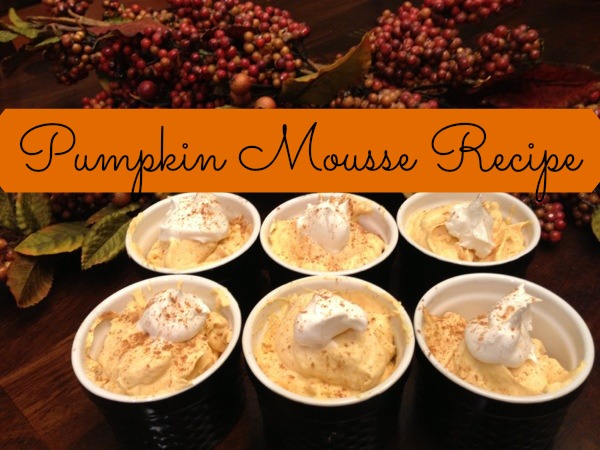
Easy Gluten Free Thanksgiving Dessert: Pumpkin Mousse Recipe


Check out ClassyMommy.com for more gluten free recipes!

Pumpkin Mousse Recipe Ingredients

  • 1 box of vanilla instant pudding and pie filling mix
  • 1/4 teaspoon pumpkin pie spice (Alternatively you can use Cinnamon – but any version of Pumpkin Pie Style spices taste best!)
  • 2/3 cup Evaporated Fat Free Milk (Small 5 fl. oz can)
  • 1 cup LIBBY’S 100% Pure Pumpkin – (This is about 2/3 of a can)
  • 2 1/2 cups thawed fat-free frozen whipped topping

Pumpkin Mousse Preparation Directions

  1. Mix together your dry ingredients first – the pudding mix and pumpkin spice.
  2.  Next, using a whisk, add in your evaporated milk. Mix well.
  3.  Add in your Libby’s pure pumpkin and stir everything well.
  4.  Finally add your thawed out whipped topping.
  5.  I recommend 2 1/2 cups of whipped topping as I find the pure pumpkin very rich.You can add more or less to taste if you’d prefer but my family likes this ratio best.
  6. After you scoop the pumpkin mousse into serving cups, top with a dollop of whipped cream and sprinkle more cinnamon or pumpkin spice on top.

Saturday, December 21, 2019

GLUTEN FREE NUTELLA LINZER TART COOKIES

a stack of gluten free linzer cookies tied with baker's string

INGREDIENTS

  • 1 1/2 cup almond flour
  • 1/2 cup gluten free flour blend, (*Note, my flour blend has xanthan gum included. If yours doesn't, add 1 teaspoon.)
  • 3/4 cup sugar
  • 1 stick butter, melted
  • 1 egg
  • powdered sugar
  • Nutella

INSTRUCTIONS

  1. In a large bowl, add the dry ingredients.
  2. Whisk to blend.
  3. In a small bowl, add butter, sugar, and egg.
  4. Mix well.
  5. Pour the wet ingredients into the dry ingredients.
  6. Mix and put dough onto plastic wrap.
  7. Refrigerate for 1 hour.
  8. Preheat the oven to 350 degrees.
  9. Remove dough and place on wax paper.
  10. Put another sheet of wax paper onto the top and roll to 1/2 inch thick.
  11. Use a linzer cutter to cut the shapes.
  12. Bake 8 minutes, remove to cooling rack.
  13. When cool, top the bottom with Nutella and add the top.
  14. Dust with powdered sugar.
Yields 24

Saturday, March 5, 2016

Saw this Gluten Free Mini Cheesecake recipe on Pinterest!


Mini  Cheesecakes (grain-free, gluten-free):

Mini Cheesecakes (grain-free, gluten-free)

♥♥♥♥♥
Rated 5.0 by 4 readers
Mini Cheesecakes (grain-free, gluten-free)
  • Prep Time: 
  • Cook Time: 
  • Ready in: 
  • Yield: 12

Ingredients

    For the crust:

  • 1 1/4 cups (125 grams) blanched almond flour
  • 1/4 cup (50 grams) granulated sugar or raw sugar
  • pinch of salt
  • 1 tablespoon lemon zest
  • 3 tablespoons (42 grams) unsalted butter, melted and cooled slightly
  • For the filling:

  • 1 pound (450 grams) cream cheese
  • 1/2 cup (100 grams) granulated sugar or raw sugar
  • 1 teaspoon vanilla extract
  • pinch of salt
  • 2 large eggs, room temperature
  • For decoration:

  • berries and powdered sugar, optional

Directions

  1. Preheat the oven to 350 °F (175 °C). Line a muffin pan with 12 muffin liners.
  2. Prepare the crust. In a medium mixing bowl, stir together all the dry ingredients, then stir in the butter and mix until thoroughly combined.
  3. Divide the mixture between the liners (18 grams or 3 1/2 teaspoons of mixture per liner) and lightly press down with the bottom of a shot glass.
  4. Bake for 10 minutes or until very lightly browned. Remove from the oven and cool for at least 10 minutes while preparing the filling.
  5. Using an electric hand mixer or a stand mixer fitted with the beater attachment, beat the cream cheese and sugar at medium speed until light and creamy. Add the vanilla and salt and beat until combined. Beat in the eggs on low, one at a time, and just until well incorporated. Do not over mix!
  6. Fill each liner about 2/3 full with the batter and bake for 10 minutes or until the centers of the cheesecakes don't jiggle when the pan is tapped. Open the oven door (at least 1 foot wide) and let the cheesecakes cool to room temperature - about 1 1/2 hours. For easiest removal, remove the paper liners now. They can also be removed after chilling, though a little more cheesecake may stick to the liners then.
  7. Chill for at least 2 hours before serving. Decorate with berries and dust with powdered sugar, if desired. Refrigerate for up to 4 days.

Sunday, January 17, 2016

Two Ingredient Pancakes!


credit
Yep, one banana, two eggs, and fry them...that's it!
Definitely trying these!

Great recipe that I saw on pinterest originally!

Thursday, July 23, 2015

4 INGREDIENT GLUTEN FREE PEANUT BUTTER COOKIES

4 INGREDIENT GLUTEN FREE PEANUT BUTTER COOKIES
 
PREP TIME
COOK TIME
TOTAL TIME
 

Easy, delicious gluten free peanut butter cookies!
Author: 
Recipe type: Dessert
Cuisine: American
Serves: 18
INGREDIENTS
  • 1 egg
  • 1 cup peanut butter
  • 1 cup sugar
  • 1 tsp vanilla extract
INSTRUCTIONS
  1. Preheat oven to to 350 degrees.
  2. In a bowl combine all ingredients.
  3. Use a cookie scoop or spoon to drop 1" balls of dough onto greased cookie sheet.
  4. If desired add the classic peanut butter cookie cross hatch by pressing a fork sprayed with nonstick spray into the top of each cookie.
  5. Bake for 10-12 minutes.
  6. Cool on rack and enjoy!
link

Monday, July 20, 2015


(GLUTEN FREE) SOUR CREAM CHEESECAKE
Prep time
Cook time
Total time
 
Yields/Serves: 16
Ingredients
  • Chex crust or GF cookie crust prepared in 9-inch spring form pan (If not doing the Chex crust I recommend 1½ cups GF shortbread cookie crumbs plus 2-3 tbsp butter for a wonderful crust)
  • 3 8-ounce packages of cream cheese, softened
  • 14-ounce can sweetened condensed milk
  • 4 large eggs
  • 8-ounces sour cream
  • 1 tablespoon vanilla extract
Instructions
  1. Preheat oven to 350 degrees; place pan of water on lowest rack in oven - this helps prevent the cheesecake from cracking during baking.
  2. In large mixing bowl beat cream cheese until fluffy. Gradually beat in sweetened condensed milk until smooth. Beat in eggs, one at a time, then sour cream and vanilla.
  3. Pour into 9-inch spring form pan. Bake 50-55 minutes until edges are light golden brown. The center will still be very slightly soft. Let cool, then refrigerate at least 4 hours to chill completely

Sunday, July 19, 2015

Gluten-free Chicken and Dumplings


Gluten-free Chicken and Dumplings
Soup
  • 2 large chicken breasts
  • 1 cup chopped carrots
  • 1/2 cup diced celery
  • 1 onion diced
  • salt & pepper
  • 7 cups chicken broth
Dumplings
  • 3/4 cup brown rice flour
  • 1/2 cup tapioca flour
  • 1/2 teaspoon baking soda
  • 1 teaspoon sugar
  • 1 teaspoon salt
  • 1/2 teaspoon pepper
  • 3 tablespoons shortening
  • 1/2 cup almond milk
Cover the bottom of a large crock pot with the vegetables.  Place the chicken on top of the vegetables and season with salt and pepper.  Pour the chicken broth over the chicken.  Cook on low for 6 hours.
After 6 hours, remove the chicken and turn the crock pot onto high.
To make the dumplings, stir together the dry ingredients.  Cut the shortening into the dry mixture until it resembles coarse crumbs.  This is easiest with a pastry cutter, but a fork will also work.  Add the almond milk and stir until it forms a thick dough.  You can add additional almond milk if your dough is too stiff to mix.
Drop dough by the tablespoon into the soup.  Cook on high for 1 to 1 1/2 hours or until the dumplings are not doughy.
While the dumplings are cooking, shred the chicken with two forks.  When the dumplings have about a half hour left of cooking time, add the chicken back into the soup and stir.

Wednesday, July 15, 2015

No Bake White Chocolate and Raspberry Protein Cookies (Gluten free)

No Bake White Chocolate and Raspberry Protein Cookies- These require 1 bowl and 5 minutes to whip up and are #vegan #glutenfree and refined #sugarfree- High protein option too! -thebigmansworld.com
No Bake White Chocolate and Raspberry Protein Cookies

Ingredients
  1. 3 cups gluten free oat flour (rolled oats ground into a flour)
  2. 2 standard scoops vanilla protein powder (can sub for an extra 1/2 cup oat flour)
  3. 2 T granulated sweetener of choice (Optional)
  4. 1/2 tsp sea salt
  5. 1/2 cup + 2 T nut butter of choice (I used peanut butter)
  6. 3/4 cup brown rice syrup (can sub for honey if not strict vegan)
  7. 1/4-1/2 cup unsweetened almond milk*
  8. White chocolate chunks (make homemade version listed earlier if strictly vegan)
  9. Dried Raspberries and cranberries
Instructions
  1. Line a large baking tray with baking paper and set aside.
  2. In a large mixing bowl, combine the oat flour, vanilla protein powder, sweetener of choice and sea salt and mix well.
  3. In a microwave safe bowl, add the nut butter of choice and brown rice syrup and heat until melted and mix to incorporate.
  4. Add the liquid mixture to the dry mixture and stir until fully combined- Mixture should be crumbly. Slowly add almond milk, one tablespoon at a time, until a very thick dough is formed. Stir through the white chocolate chunks, dried raspberries and cranberries until fully incorporated.
  5. Using your hands, form small balls and press down to a cookie shape on the baking tray. Using a fork, press down on it twice and refrigerate for at least 30 minutes before consuming.
Notes
  1. Depending on the protein powder and/or if you use all oat flour, you need to adjust your liquid mixture.
  2. These can be stored at room temperature. If refrigerated, thaw very slightly.
  3. The granulated sweetener of choice is optional- For a sweetener cookie, add 1-2 tablespoons. I prefer a more 'bland' cookie dough to bring out the flavours from the raspberries, cranberries and white chocolate chunks.

link